*This post contains affiliate links. I receive small commissions for purchases made through these links at no extra cost to you. These commissions help me keep this site up and running, in order for me to keep providing helpful and inspiring art content. :)
Unsure of how to create lights, midtones and darks in pen and ink drawings? How do you recreate value/tonal relationships present in a reference photo via pen and ink techniques? What are the best exercises for beginners?
In today's post I will be explaining a few techniques that are very useful to know when you are ready to start giving drawings a sense of realistic volume and depth. Once you can create basic outline drawings, the next step is to start practicing further observational skills which will allow you to pinpoint light and shadow areas as well as other details in subjects.
This is an essential skill to develop as you work your way towards creating more realistic artwork.
I will be including seven different shading techniques commonly used by pen and ink artists. However, I use many of these myself when drawing with pencil and they can be used when drawing with charcoal, chalk, and many other kinds of drawing media.
I will not be going into the graphite blending technique that is commonly used to create hyperrealistic drawings because what I want to get across with this lesson is the importance of value placement, more than creating realistic texture.
Value or tone is an incredibly important Art Fundamental to understand if we're looking to start developing any sense of realistic three-dimensionality and depth in our drawings.
It is a wide range of values, starting from lightest lights, to a wide range of midtones, to darkest darks, that give a subject a sense of three-dimensional form.
Many artists argue that value is even more important than color.
It's common for artists to create sketches prior to starting paintings and, in these sketches one of the most important things to decipher (besides proportion and placement of elements within the composition) is where the darkest and lightest areas will be.
Let's begin with the topic!
Hatching, crosshatching, stippling, etc. are traditional drawing techniques that have been used by artists for centuries. All of these are nothing but patterns and groups of lines (or dots) placed in well thought-out ways in order to transmit a sense of volume, three dimensionality, depth and texture.
Some artists style is more controlled and precise, which lead to cleaner and more organized lines, while others have a more free and expressive style. I greatly recommend looking for drawings by Van Gogh, Durer and Da Vinci to be able to see different results.
First off, I want you to take a moment to observe the following etchings created by Giorgio Morandi.
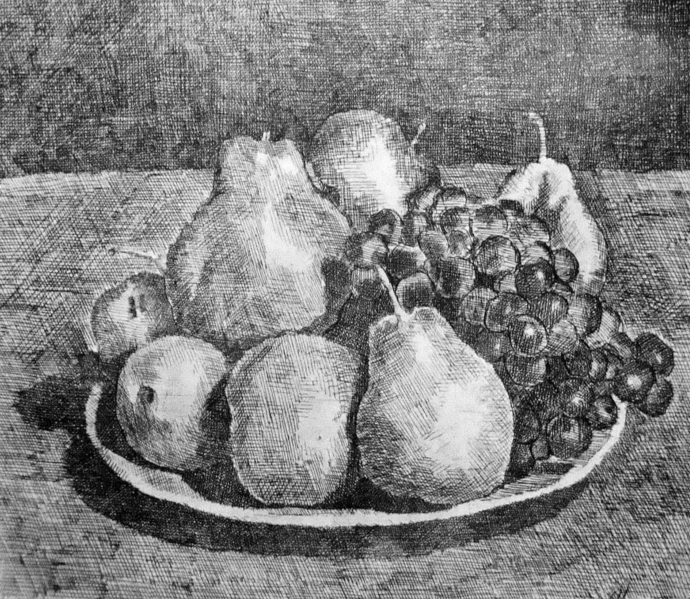
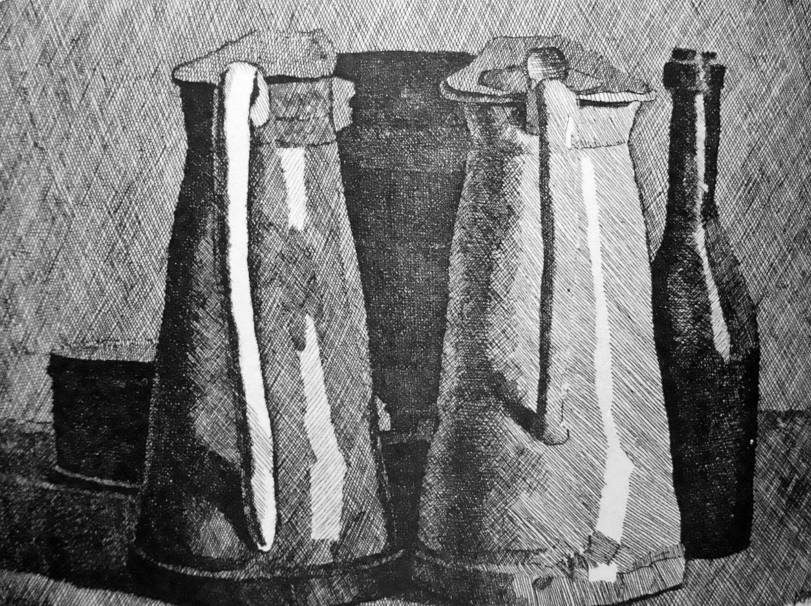
These etchings were created by using a combination of hatching and crosshatching. I want you to notice the lightest areas in the artworks, as well as the darkest. Notice how the lightest areas have nearly no lines in them, so they look almost entirely (or entirely) white. Now notice how the darkest areas are full of lines to the point at which they look close to (or entirely) black.
Try pinpointing the different values in between the lightest and darkest throughout the drawings. How many can you count? How many variations in value do you think you can create using only one pen or pencil? Practice creating value strips showing gradual tonal changes using the downloadable PDF at the end of the post (VALUE_STRIPS.PDF). This will help A LOT!
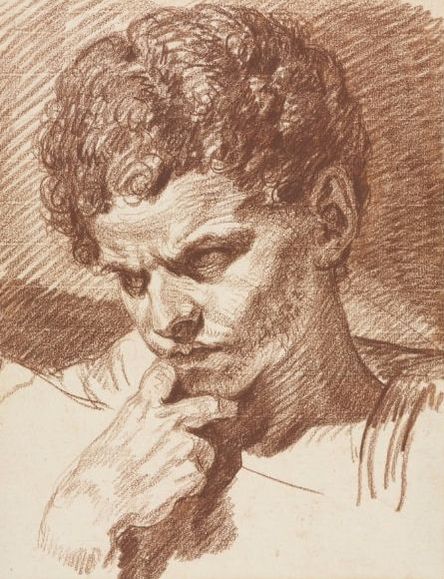
Jean-Baptiste Greuze red chalk sketch. Head of Caracalla, 1768.
Now take a moment to observe this piece by Jean-Baptiste Greuze created with only red chalk. Notice how this drawing is more complex due to the nature of the subject. Notice the whitest areas and the darkest areas and the values in between.
In this drawing, the artist used a mixture of shading techniques. I can find both straight lines, contour lines and even some scribbles which create the texture of curly hair.
Understand that different shading techniques can be used together in one same piece.
Ok! Moving on!
Follow along with the tutorial below to practice hatching, crosshatching, weaving, contour lines, scribbling and stippling:
If you enjoyed this video and found it helpful, make sure to subscribe to my YouTube channel. I share a brand new video every week with art tips, drawing and painting tutorials and mindset/productivity tips for artists. *Subscribe HERE*
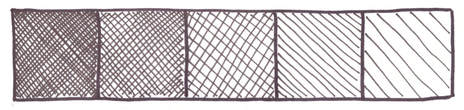
Different Shading Techniques
Here are seven different shading techniques that you can use in your drawings and sketches. When using all of these techniques, it's important to keep in mind that, even though lines do not have to be super perfect, you do have to take your time and think about what your doing.
It's essential to keep a sense of consistency in terms of the marks you create throughout your piece and to stay mindful of how your mark-making is going to affect its outcome. Keep line thickness, direction, and overall size in mind throughout your drawing process!
What's even MORE important, is that the lines you create accentuate the form of the object you are drawing. I ncrease the density of your lines by placing them closer together or creating a second (or even third) layer overlapping the first in areas that you want to appear darker.
If you need practice drawing sets of parallel lines, I recommend practicing until your hand becomes steady enough. Practice each of the following techniques using the downloadable PDF at the end of the post titled SHADING_TECHNIQUES.
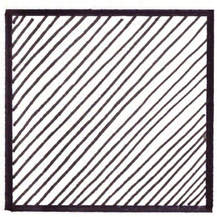
1. Hatching/Parallel Hatching
This can be considered the most basic of all of the shading techniques included here. It involves creating groups or patterns of parallel lines. These lines don't have to be completely vertical or horizontal. They can also be slanted or follow any angle you'd like, as long as this direction is uniform throughout the area you are shading.

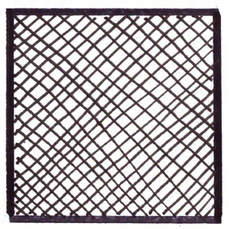
2. Cross Hatching
Cross Hatching is like taking parallel hatching to the next level. You create a first layer of parallel lines (in any direction) and a second layer of lines is drawn on top in a perpendicular or nearly perpendicular manner. This technique is probably the quickest of all due to the fact that you are able to create darker values faster than with the other techniques. I tend to go for this method most of the time myself.
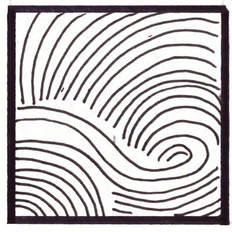
3. Contour Hatching
This technique involves using lines that follow the curves or lines of the initial contour/outline drawing. When used correctly, contour hatching enhances volume and three-dimensionality in a very striking manner. With this method, it is important to be able to visualize the three-dimensionality and planes of whatever it is your drawing.
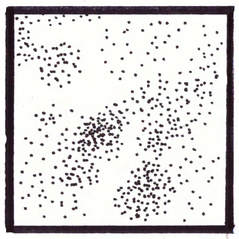
4. Stippling
When stippling, tone and texture is built up by applying dots in different densities. This technique takes time and you have to mak e sure that you don't start creating lines instead of dots.
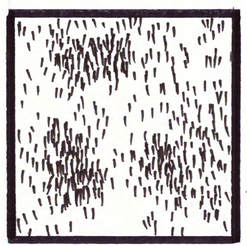
5. Tick Hatching
This method is similar to stippling but instead of making dots, you make short lines. In darker areas, lines are placed in an overlapped manner. I personally don't use this method very much because I find the texture it creates looks like hair! However, it is very useful when using oil pastels or similar media to create Impressionist-style art.
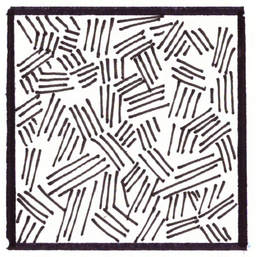
6. Woven Hatching
Woven Hatching leads to a very interesting outcome when done correctly. This technique involves creating sets of short(er) parallel lines in one direction and then placing another group of parallel lines next to it in perpendicular or near-perpendicular directions. Crosshatching can be later added to add density in areas that require darker values.
7. Scribbling
Scribbling is an excellent technique to use when drawing specific subjects like trees or hair because it not only creates values, but also transmits a sense of texture. In the drawing below I used scribbling to create the leaves of the tree and the effect of grass below it. I love scribbling!